

Is your Start Menu or Search Bar has stopped working in windows 10?, Do not worry, We will give you the perfect solution so you can fix it by yourself.
Table of Contents
1.Fix Windows 10 Start Menu Not Working Through Windows Power Shell
You can fix the issue by re-registering all universal windows platforms (UMP / Windows Store) apps in the system. To do it, follow the given steps below.
- Firstly, Right-Click on the Windows icon and click on Windows Power-Shell(Admin).
- Secondly, Copy and paste the following command in the Windows Power-Shell and press Enter.
Get-AppXPackage -AllUsers | Foreach {Add-AppxPackage -DisableDevelopmentMode -Register “$($_.InstallLocation)AppXManifest.xml”}
- Wait for the command to execute.
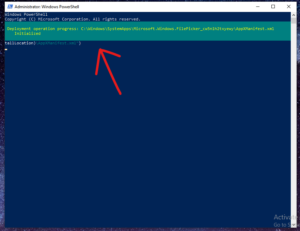

- After the execution of the command just restart your computer.
2.Check The Search Services And Indexing Settings
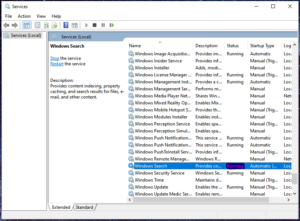
- Firstly, press the key (Win + r) and type services.msc, and click ok.
- Now, In-services scroll down and look for ( Windows Search).

Also Read: How To Fix BSOD Error In Windows 10.
- Secondly, Make sure that Windows Search Is running, then Right- Click on it and click on properties.
- Now, Set the startup type to Automatic (Delayed Start) and hit OK.


- Now, Just restart the Windows Search Service.
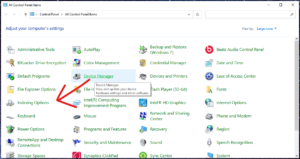
- Thirdly, press the key (Win + r) and type Control Panel and click OK.
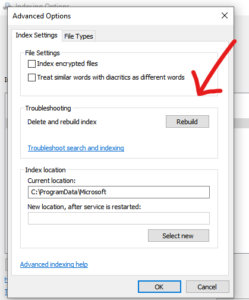
Now, In the control panel click on Indexing Options.

- Select Start Menu and click on Advanced.
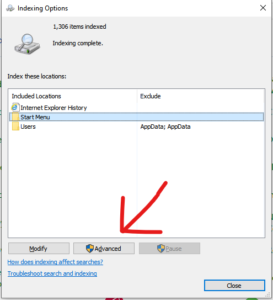

- Now, in advanced options click on Rebuild ( The re-indexing process can take some time).

3.Fix Windows 10 Start Menu Not Working Through Troubleshooting
- Firstly, press the key (Win + r) and type Control Panel, and click OK.
- Secondly, Click on Troubleshooting and open Hardware and Sound options.
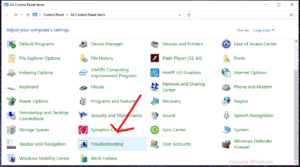

- Now, Click on Background Intelligent Transfer Service.


Also Read: How To Fix Slow Performance Issue In Windows 10
- After Troubleshooting, just restart your computer.
4.Fix Windows 10 Start Menu Not Working By Updating Drivers And Bios Firmware
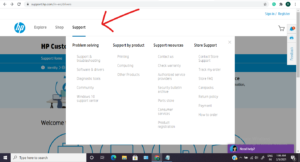
- Firstly, open any browser and search your system’s manufacturing site (Dell, HP).
- Secondly, Hover on support and look for Software and Drivers and click on it.

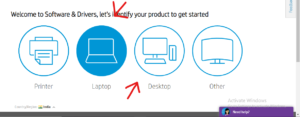

- Now, you will have two options either you can enter your device’s serial number or Let the support system detect your device.
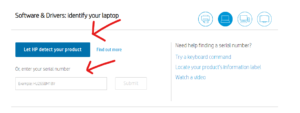

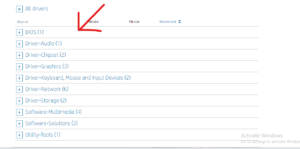
- After the detection process, You will be able to see all your drivers, Just download and install the latest ones.

5.Windows Update
If any of the above-mentioned methods don’t work then the last option is to update your windows, to update your windows 10 follow the steps below.
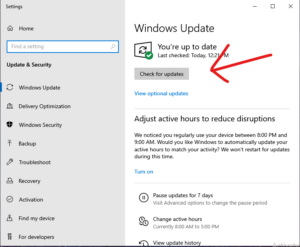
- Firstly Go to the windows search bar and type Windows Update.
- In windows update, you will see an option (check for updates ) click on it then go to the next step.
- If there is any windows update available it will show you, Just download and install it & restart your device.

Also Read: How To Fix Blurry Screen Issue In Windows 10
In conclusion to the above post, We hope now your problem of slow performance is fixed.
To get more updates related to windows 10 Fixes, Tips and tricks, Please Do check out our website.
You May Like:
People also ask
- How do I fix start menu not working?
- Can’t search in Windows Start menu?
- How do I fix the search bar not working?