Is your computer’s microphone is not working in your windows 7 ? Do not worry just follow the guide below and fix the issue on your computer.
Table of Contents
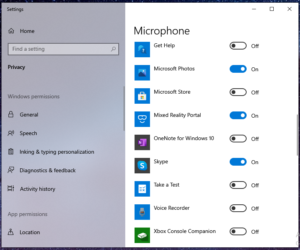
1.Turn on Microphone Under The Privacy Settings
- Firstly, Go to the search bar and type Microsoft Privacy Settings and open it.
- Now, Scroll down and turn on the access for all apps.

Also Read: How To Fix Bsod Error In Windows 10.
2. Fix Microphone Not Working In Windows 7 Through Device Manager
- Firstly, go to the search bar and type device manager, and open it.
- Now go to the system devices and click on it.
- Under the list, Right-click on Intel® Smart Sound Technology and click on Update Driver.
Also Read: How To Fix Slow Performance Issue In Windows 10
- Now, Click on Browse my computer for drivers then click on Let me pick from the list of available drivers on my computer.
- Choose High Definition Audio Controller and click on next.
- Let the new driver install on your computer.
- After the installation, Restart your computer.
3.Uninstall & Re-Install the driver
- Firstly, go to the search bar and type the control panel and open it.
- Now, Click on Uninstall the program and scroll down to Realtek High Definition Audio Driver.
- Right-click on Realtek High Definition Audio Driver and uninstall it.
Also Read: How To Fix Blurry Screen Issue In Windows 10
The Installation Process.
- Firstly, Open any browser on your computer.
- Now, go to your system’s manufacturer company (DELL, HP).
- Look for software and drivers and click on them.
- Now, either you can enter your System’s product id or let the support system identify your product by itself.
- After the detection, It will show you a list of your computer drivers. Now you need to check the Realtek High Definition Audio driver for your computer.
- After that, you need to download the driver and install it on your computer.
- Once, Driver will install it on your computer then restart your computer and check the Microphone is working or not. If still Microphone is not working then move to the next step.
4. Fix Microphone Not Working Windows 7 Through Sound Settings
- Firstly, Go to the search bar and type Sound Setting, and open it.
- Secondly, Check the device is disable or not, If the Microphone device is disabled then you need to enable the device and move to the third step.
- Now, under the recording section Right-Click on the microphone and click on configure speech recognition.
Also Read: How To Fix Flickering Screen Issue In Windows 10
- Now, click on start speech recognition and hit next.
- Under start speech recognition select desktop microphone and click next.
- Now, Read the given sentence and check if the microphone is working or not, and hit next.
5.Test Microphone Through Voice Recorder
- Firstly, Go to the search bar and type Voice Recorder, and open it.
- Now, click on the microphone icon and say a sentence and click on it to stop recording.
- Test the recording you recorded to check if the microphone is working or not.
6. Fix Microphone Not Working Windows 7 Issue Through Windows Update
If any of the above-mentioned methods don’t work then the last option is to update your windows, to update your windows 10 follow the steps below.
- Firstly, Go to the windows search bar and type Windows Update.
- In windows update, you will see an option (check for updates ) click on it then go to the next step.
- If there is any windows update available it will show you, Just download and install it & restart your device.
In conclusion, to the above post, We hope now your Microphone Issue is solved.
Most importantly, To get more updates related to Windows 10 Fixes, Tips and Tricks. Do check out Tremblzer
People Also Like