

Are you Facing low Ethernet speed in your windows 10? Do not worry just follow the guide below to increase the ethernet speed on your computer.
Table of Contents
1.Device Manager
- Firstly, Go to the search bar and type Device Manager, and open it.
- Secondly, Now go to the Network Adapters and click on it.
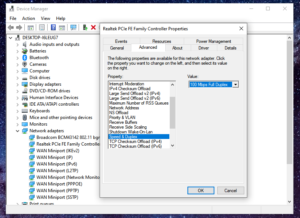
- Under the list right-click on the Realtek PCIe FE Family Controller and open its properties.
- Now under the properties, go to the Advance and change the following settings.
- Change the Speed & Duplex option from Auto Navigation to 100Mbps Full Duplex.
Note: If you have 100 Mbps speed from your ISP (Internet Service Provider) then you will get up to 100 Mbps speed on your computer. It depends upon the internet speed that you're getting from your ISP.
Large Send Offload v2(IPv 4) From Enabled to Disabled.
Large Send Offload v2(IPv 6) From Enabled to Disabled.

2. Increase Speed Through Registry Editor
Follow the steps below to increase the speed of the internet with the help of Registry Editor.
- Firstly, Go to the windows search bar then type Registry Editor and open it.
- Secondly, Expand the HKEY_LOCAL_MACHINE folder then go to the next step.
- Click on the System folder and.
- Expand CurrentControlSet folder.
- Click the Services folder.
- Scroll down and Expand the Tcpip folder.
- Click on the ServiceProvider folder.
- Now change the following properties value data to the given data below.
DnsPriority and type 7 in value data and click OK.
HostsPriority and type 6 in value data and click OK.
LocalPriority and type 5 in value data and click OK.
NetbtPriority and type 8 in value data and click OK.


3. Increase Ethernet Speed Through Group Policy
This method works only in the above Windows 10 home versions because windows 10 do not support the group policy function
- Firstly, Go to the windows search bar and type Group Policy and open it.
- Secondly, Now click on the Computer Configurations then go to the next step.
- Click on Administrative templates.
- Now open the Network folder and.
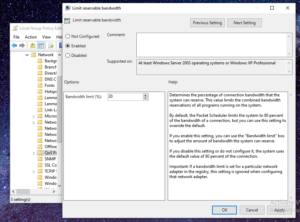
- From the following list double-click and open Qos Packet Scheduler.
- Now Enable the Limit Reservable Bandwidth and Change the Bandwidth value to 20% and click Ok.

4.Increase Ethernet Speed Through Network Properties
- Firstly, Go to your search bar and type Control Panel and open it.
- Now click on Network and Internet and open Network and Sharing Center.
- Now click on Change Adapter Settings and.
- Right-click on Ethernet and open its properties.
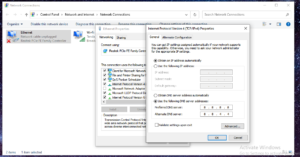
- Scroll down and check Internet Protocol Version 4 (TCP/IPv4 ) and click on properties.
- Now click on Use the Following DNS server Automatically and change the following DNS servers.
Change Preferred DNS server to 8.8.8.8
Change Alternate DNS server to 8.8.4.4 - Now click and ok.

5.Increase Ethernet Speed Through Delivery Optimization
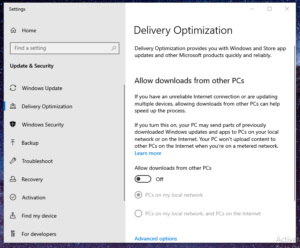
- Firstly, Go to the windows search bar and type Windows Update setting and open it.
- Secondly, Now click on Delivery Optimization then go to the next step. And off (Allow downloads from other PC’s ).

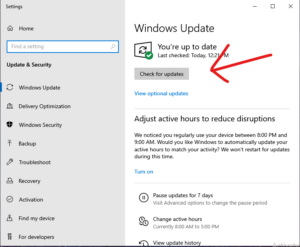
6.Increase Ethernet Speed ThroughWindows Update
If any of the above-mentioned methods don’t work then the last option is to update your windows, to update your windows 10 follow the steps below.
- Firstly, Go to the windows search bar and type Windows Update.
- Secondly, In windows update, you will see an option (check for updates ) click on it then go to the next step.
- If there is any windows update available it will show you, Just download and install it & restart your device.

In conclusion, to the above post, We hope now your problem of low ethernet speed is solved.
To get more updates related to windows 10 Fixes and Tips and tricks, However, you can always check out Tremblzer.