Are you facing an error on your Support Assist application while opening it, Do not worry follow the methods below and fix the issue.
Table of Contents
1.Reset And Repair The Support Assist
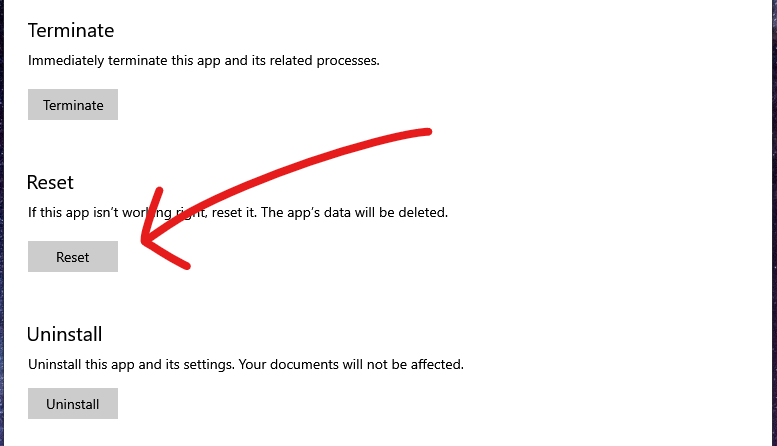
- Firstly, Right-Click on the support assistant icon and click on settings.
- Secondly, In the settings, you will see the option for reset and repair the app.
- Just click on it and restart your computer.

If this method doesn’t work then move to the second method.
2.Revo Uninstaller
Why using Revo Uninstaller
- It uninstalls programs and additionally removes any files.
- It removes Windows registry entries left behind by the program’s uninstaller or by the Windows uninstall function.
- Firstly, open any browser and search Revo Uninstaller and download the free version of it.
Installation Process:
- Firstly, Accept the terms and conditions and click on next.
- Secondly, Choose the location where you want the application to install.
- Now, Just click on next and wait for the application to install.
- After the installation, just click on Finish.
3.Uninstall The Support Assist
- Firstly, Open the Revo Uninstaller, Find Dell Support Assistant from the list, and click on uninstall.
- Now, It will ask you, If you want to make restore data before uninstalling, just uncheck it and click on Continue.
- Choose Moderate from the three options and click on Next.
- Now, It will show you all the leftover directories, Click on Next and wait for the application to uninstall.
4.Install The Support Assistant
- Firstly, Open any browser and Search for Dell/support.
- Now, Download the support assist application.
- After download, Run the SupportAssist launcher located in the bottom left of your browser window.
- Click, Yes to complete the installation process.
5. Update The Drivers With Support Assist
- Firstly, Open the Dell Support Assist.
- Secondly, click on the first option i.e (Get Drivers And Download).
- The support assistant will automatically start checking for updates.
If the problem is still not solved, then call your manufacturer they will surely fix the issue.
In conclusion to the post above, we hope now your problem is solved.
To get more updates related to Windows Fixes, Tips and Tricks, and Entertainment, Do follow Tremblzer.